
-This is where we hold them! This is where we fight! This is where they die!
-King Leonidas
OOOOK! I'm really excited about this... my latest project, lasted about two months, involved Stormcast Eternals, as you can easily argue by the picture, and has been something heroic; 47 models in less than, actually, 30 days in one of the most intensive time of the whole year for my business but, believe me, i've been boosted by them, Stormcasts. Although i was sceptic in first instance at the time they've been made (by and large 1 year ago, maybe few months more, am i wrong?) i had to think again and get back on my steps because, whatever shall be the angle through you are going to see them, or evaluate them, they're going to be EPIC. They are epic to paint, imagine, built, play.
You can think of them as mighty Riders of the Storm and get back to teen's (although would be better the "on" version ;P) or have them in full cinematic stance, just childish when you are going to crush ANY opponent on the table top, or dramatic as anything else, as they descend from heavens on a desperate world to fight horrors, eternally.
So... i'm very proud to present you the Guardians of The Ages, my personal and custom Stormhost that, as you'll can see in the future lurking the blog, have been actually caught somewhere in time and picked up from a distant age by Sigmar himself to better serve in the raging war against Chaos.
However in this post we'll talking of the making of them, not their background; in particular we'll see how to make Liberators, exploring metal-shade-armours, non conventional battle-damaged shields, fast but effective basing using powders alongside the old classical and brown worn-out leather. Let's start!
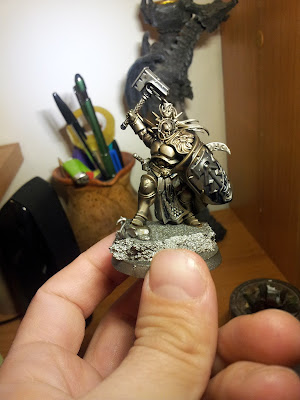
 |
| Elke's Temple Liberators with Sigmarite Shields and Warhammers |
Part 1: Armours
First of all the armour. My idea was to make them, cold as the ages, algid as time so i chose colors in the blue-spectre and i explored silver to give them a sensation of deep.


Primer/base with silver/metal; in my case is Leadbelcher.

Start drybrushing armour mixing silver and dark gold toghter, Leadbelcher and Balthasar gold for me; you need to use just a little amount of gold.

Make first shade mixing a yellow wash (in my case seraphim sepia) with medium... you can easily remain on a ratio of 50% for both of them. Important is mitigate the yellow.

Add a second wash mixing about 4 parts of blue wash with 6 of medium.

Drybrush with first silver you used and then, progressively less, with a lighter tone, Necron Compound for me.

Finish highlighting with a brighter silver tone (Runefang steel in this case).

Part 2: Battle-damaged Shields
I do not like at all shiny things and armours when we talking about war; i mean i liked imagine my warriors captured in a moment during an harsh campaign, so is impossible their equip is clean and as good as new. For Stormcast is surely harder to find a way to make them "weather", but i figured out one surfing the net and consulting Francesco (the master of weathering who creates this, remember?) just before starting the project; an easy trick using Liquid Mask.
You'll need a Liquid Mask's Flacon (i use Vallejo) and a short-bristle brush (i use an old brush, very damaged and with bristles almost removed at all).


With a brush you not intend to use for anything else both now and in the future start add a solid coat of mask over the points you want to weather.

Let it dry and add color to shields, in my case Sotek Green.

Then start "scratching" with no-bristles brush very gently to obtain a desired outcome; you have to scratch the surface within hours from mask's application.

Next step is to wash with blue (Drakenhof for me) all the blue part.

Add some weathering to the shield's edges.

Finish drybrushing scratches and shield with silver, very gently.

Part 3: Leather
I imagined my Stormcast like no-frills warriors, so i decided to avoid white clothes and whatever for a more pratical layout of durable leather.
Coat with a dark tone of brown, Dryad Bark in my case.

Wash with Agrax Earthshade. Then apply very small stright line with both Steel Legion Drab and Karak Stone to reapet scratches on the leather. After this drybrush with a old drybrush (very worn) Steel Legion Drab on the surface... in this step your brush has to be almost wiped out of any color, i mean you'll have to press hard on the model to see any result. So you can tapping and brushing heavy until you'll satisfied.

Repeat the same drybrush process with Karak Stone, with a minor amount.

Part 3: Parchments, Reds and Blue-effect on Metals
Having armour silver and would have weapons made of "simple" metal the question of how distinguish the two rose in my mind in the early process... so i remained stick to the shades-of-blue and decided to add some glow effect on silver weapons.
TIP. To have the best outcome on the weapons go back to the Part 1 and avoid the first wash on them. This will help you to keep them brighter.
Mingle blue glaze (Guilliman Blue for me) with medium (ratio of 1:1) and add the mix on the parts you would glowing in blue.
You can always drybrush with silver after (or before) this application to adjust the color, one thing remember: rest smooth, very smooth. Avoid color pile and darker tones; two or three hands are always better of a heavy one.


Coat red part in Khorne Red, parchments in Rakarth Flesh.

Wash reds with Carroburg Crimson and parchments with Reikland Flesh-shade.

Drybrush the entire surface of the parchments with the same color, Rakarth Flesh; and drybrush reds with Astorath Red.

Lightly drybrush with Pallid Wych Flesh the parchments and hair with Kindleflame.

Part 4: Basing
Scorched lands of Aqshy inspired me for Guardians' basing and, listen to my girlfriend's complain about them (she doesn't like SCE very much, says they are too "stocky") i decided to make them less "stocky" putting every single warriors on a small rock, to slender them.
I needed to find a fast, not expensive way to achieve this and i bought a bag of cork (as usual!), cutting it to fit bases and resemble rocks.

Cover all the base with texture. I used Vallejo Dark Earth.

Wash with light brown shade.

Drybrush with Steel Legion Drab.

Do the same with Karak Stone.

Then take the same brush you had used for the leather hard-drybrushing and add little amounts of powder around, tapping. I used Forge World Light Earth.

Feel free to add some spray fixer on the base to help powders keeping in place but, if you do, add very little amount of it. Sometimes i use this "glossy" Topcoat Whatever.

Round bases with the color you like, i chose a beatiful shade of grey to fit the rest of the color scheme and add them peculiarity compared to my other projects.

Final models:
And the version of 5 men with swords instead of hammers:

Hope you liked the tutorial and see you next time for the making of the rest of the Guardians of The Ages project!
Thanks for reading!
No comments:
Post a Comment