- Pain may be my flesh
Death may be my fate
but Victory is my Name
- Tylos Stormbound's Honour Scrolls during the Crucible of Blood's war
Reamlgate Wars - Stormcast
After their second Battletome's release, Stormcast have become a very solid army. almost unbeatable for the majority of AoS factions. I managed to bring havoc on any challenger in my local gaming club: Nurgle, Dwarves, Khorne, Ironjawz, Slaves to Darkness, Death, Skavens, Seraphon, Beastclaw Raiders, Flesh Eaters ecc... Only against Tzeentch I lost a bunch of matches. Exploiting their new command trait Staunch Defender, which adds 1 to any save rolls to any unit within 6" from your general (if not charging) and combining it with Lord Castellant skill on a 15-20 men unit of Liberators will make your 300/400 points Battlelines unkillable; with shields their saves shall be at 2+ with rerolling 1's.
So be it, but many players begun to grumble about that, and with reasons; so unless I'm playing against Tzeentch or an equal I started to use Vanguard Chamber in the majority of my matches, avoiding Staunch Defender (that's quite un-thematic for an army that rely on speed and ambushes) and using Aefirin, my Lord Aquilor, as general.
That helps you to change quite a lot your playing style, too; the classic Warrior Chamber set-up was becoming boring, really powerful but boring. This is one of the things I love more in Stormcast: they are unyielding warriors but they have a very yielding way to wage war, able to adapt to each situation on the tabletop very easily.
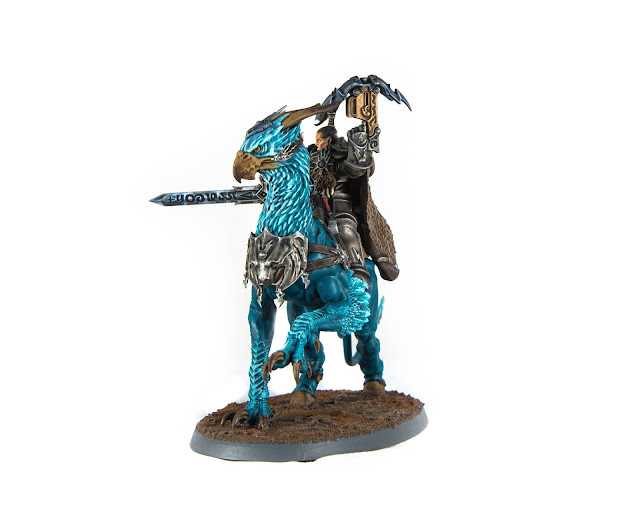
Ok... but this is not a tactical corner, although I always love to chat about that, so straight on to the painting tutorial for him, Lord Aquilor, a striking model and a real beast on the battlefield!
In this tutorial we are going to see how to paint the rider's face, and the few hard features from the model, such as Gryph Charger eyes.
Therefore I refer you to some other posts of mine to complete the job.
You can check my Stormcast Eternals Liberators tutorial for armour, using liquid mask, leathers, bases, weapons and more, while you can have a look of my speed painted Gryph-Hound for the Gryph-Charger palette and my Vanguard Palladors showcase for taking some inspiration about.
The only real advice I can give you is, when using Gryph Hound's palette on your charger, to go fully or almost fully layering instead of drybrushing; I mean you can use drybrush to create the very foundations of your highlights but after that you have to move to layering for a better definition of your job.
Part 1: Face
Basecoat with Zandri Dust.
Then apply a very thin coat of Kislev Flesh, be sure to use a good amount of water in the process.
Mingle Lahmian Medium and Reikland Fleshade in a 50-50 ratio.
Take a very small brush and wash the skin.
With Kislev Flesh again reprise all the face features.
Use White Scar to coat the eyes.
Then with Dark Reaper (or black if you prefer) add two tiny dots in the center of the pupils. Leave white around but not above, trying to make a look that repeat his features. In this step you'll make a bunch of mistakes but don't worry, you have White Scars and Kislev to keep correcting where you need to.
Also use Scars on teeth.
It is time to mix Nuln Oil and Lahmian, 50-50 ratio will be good again.
Use the mix to border eyes and teeth; you have to use a supersmall brush.
Reprise again mingle Kislev with White Scars adding extreme highlights on the face's features, and on the teeth to wipe out the stains from Nuln Oil.
Part 2: Hair
Basecoat with Zandri Dust, it's very important because we are going to use this foundation to have reflexes.
Add pure Nuln Oil on it.
Use Nuln Oil super carefully to create a thin break from the skin.
Mingle a lot of water with Abbadon Black and cover all the hair surface.
Let it dry and you'll have a superfast, full of lighter reflexes black hair. You can always take your detail brush and start adding more but basically the most is already done.
Part 3: Gryph-Charger Eyes
Coat eyes with Averland Yellow.
Then using Dark Reaper paint a big dot in the center, leaving around a small amount of yellow and nothing above.
Reprise your dot with Warplock Bronze, or a very dark tone of metallic. Do it with a lot of water; it may sound strange to use metallic in a eye, but in this way we are going to make them literally darkly bright!
Paint a line with Averland cutting the dark-bright dot, from the pupil to the center.
Cover any flaws with a reprise of Warplock Bronze.
Part 4: Pelt
Coat with Steel Legion his pelt-cape.
Wash with Agrax.
Drybrush with Steel Legion and Karak Stone.
Gently Drybrush with Rakarth Flesh.
Paint claws with Ushabti Bone.
Final model (this time in both black and white backgrounds):
Thanks for reading!


No comments:
Post a Comment